目录
1、切换到/tmp目录下
bash
[root@localhost ~]# cd /tmp/
[root@localhost tmp]# pwd
/tmp
2、显示当前目录下的文件列表
bash[root@localhost tmp]# ls
dir1  message1.log  message.log  systemd-private-05911ea40d594b119513d1155474e3ec-systemd-hostnamed.service-RQjG7b  yum
3、创建一个名为 test的目录
bash[root@localhost tmp]# mkdir test
[root@localhost tmp]# ls
dir1  message1.log  message.log  systemd-private-05911ea40d594b119513d1155474e3ec-systemd-hostnamed.service-RQjG7b  test  yum
4、切换到test中
bash[root@localhost tmp]# cd test/
[root@localhost test]# pwd
/tmp/test
vim
- 5、创建一个名为 example.txt 的新文件
- 6、在文件中输入一行文本:Hello, Vim!
- 7、保存文件并退出 vim。
- 8、重新打开example.txt,插入行的一行内容,Hello,World!
- 9、将光标移动到第一行,复制从光标位置开始的2行内容
- 10、将光标移动到文件的末尾,粘贴之前复制的文本,保存文件并退出
bash# 5. 创建一个名为 example.txt 的新文件
[root@localhost test]# vim example.txt

# 6、在文件中输入一行文本:Hello, Vim!
## 按i切换到编辑模式
## 输入Hello, Vim!
Hello, Vim!

# 7、保存文件并退出 vim。
## 可以使用:wq 保存并退出
:wq
## 也可以按esc进入命令模式
## 直接输入ZZ也可保存并退出(需要有内容修改)

# 8、重新打开example.txt,插入行的一行内容,Hello,World!
## 在命令模式下输入o即可插入 Hello,World!

# 9、将光标移动到第一行,复制从光标位置开始的2行内容
## 命令模式下按gg跳转到第一行行首
## 按esc键切换到命令模式
## 输入2yy即可复制从当前行开始的两行

# 10、将光标移动到文件的末尾,粘贴之前复制的文本,保存文件并退出
## 在命令模式下,按G即可跳转到最后一行
## 按下pp键即可粘贴之前复制的文本
## :wq 保存并退出
11、查看文件大小信息
bash# 显示有48字节(byte)的大小
[root@localhost test]# ls -l
total 4
-rw-r--r--. 1 root root 48 Apr  7 00:45 example.txt
# 添加了 -h 选项,这个选项会使 ls 命令以人类可读的格式显示文件大小
[root@localhost test]# ls -lh
total 4.0K
-rw-r--r--. 1 root root 48 Apr  7 00:45 example.txt
12、查看文件时间戳信息
bash[root@localhost test]# stat example.txt
  File: ‘example.txt’
  Size: 48              Blocks: 8          IO Block: 4096   regular file
Device: fd00h/64768d    Inode: 8434464     Links: 1
Access: (0644/-rw-r--r--)  Uid: (    0/    root)   Gid: (    0/    root)
Context: unconfined_u:object_r:user_tmp_t:s0
Access: 2024-04-07 00:45:06.091038333 +0800
Modify: 2024-04-07 00:45:10.062038423 +0800
Change: 2024-04-07 00:45:10.063038423 +0800
 Birth: -
13、使用不同命令查看example.txt 文件内容
bash[root@localhost test]# cat example.txt
Hello vim!
Hello,World!
Hello vim!
Hello,World!

[root@localhost test]# tac example.txt
Hello,World!
Hello vim!
Hello,World!
Hello vim!

[root@localhost test]# head example.txt
Hello vim!
Hello,World!
Hello vim!
Hello,World!

[root@localhost test]# tail example.txt
Hello vim!
Hello,World!
Hello vim!
Hello,World!

[root@localhost test]# more example.txt
Hello vim!
Hello,World!
Hello vim!
Hello,World!


[root@localhost test]# less example.txt
# 按q退出
14、查看example.txt 文件的第一行内容
bash[root@localhost test]# head -n 1 example.txt
Hello vim!
15、查看example.txt 文件的最后一行内容
bash[root@localhost test]# tail -n 1 example.txt
Hello,World!
18、创建目录test2并修改目录权限为777
bash[root@localhost test]# mkdir -m 777 test2
[root@localhost test]# ll
total 4
-rw-r--r--. 1 root root 48 Apr  7 00:45 example.txt
drwxrwxrwx. 2 root root  6 Apr  7 00:53 test2
19、创建普通用户nebula、natasha,并切换到nebula用户
bash[root@localhost test]# useradd nebula
[root@localhost test]# useradd natasha
[root@localhost test]# su - nebula
[nebula@localhost ~]$
20、使用nebula在/tmp目录中创建一个文件nebula.file,将 ls -l 的结果重定向到nebula.file,退出nebula用户
bash[nebula@localhost tmp]$ touch /tmp/nebula.file
[nebula@localhost tmp]$ cd ~
[nebula@localhost ~]$ touch /tmp/nebula.file
[nebula@localhost ~]$ ls -l > /tmp/nebula.file
[nebula@localhost ~]$ exit
logout
[root@localhost test]#
21、切换到natasha用户,在/tmp目录中创建一个文件natasha.file,将 ls -l /tmp /tmpa 的所有结果重定向到natasha.file,退出natasha用户
bash[root@localhost test]# su - natasha
[natasha@localhost ~]$ touch /tmp/natasha.file
[natasha@localhost ~]$ ls -l /tmp > /tmp/natasha.file
[natasha@localhost ~]$ ls -l /tmp >> /tmp/natasha.file
[natasha@localhost ~]$ exit
logout
[root@localhost test]#
22、修改nebula.file文件的权限,允许natasha用户可以编辑
bash[root@localhost test]# sudo chmod o+w /tmp/nebula.file
23、使用natasha用户执行 ls -l 命令并将执行结果追加到nebula.file,退出natasha用户
bash[root@localhost test]# su - natasha
Last login: Sun Apr  7 01:05:05 CST 2024 on pts/0
[natasha@localhost ~]$ ls -l >> /tmp/nebula.file
[natasha@localhost ~]$ exit
logout
[root@localhost test]#
24、复制/etc/init.d/functions文件到/tmp目录下
bash[root@localhost test]# cp /etc/init.d/functions /tmp/
25、修改/tmp目录下functions文件名为func
bash[root@localhost test]# mv /tmp/functions /tmp/func
26、将/tmp 目录下的func文件中包含 system 的行单独保存到 /tmp/func-system.log
bashgrep 'system' /tmp/func > /tmp/func-system.log
27、在26小题的基础上,统计包含 func文件包含 system 这个关键词的行有多少行
bash[root@localhost test]# grep -c 'system' /tmp/func
20
28、将 /tmp/func-system.log 锁定,不要让任何人删除,包括root
bash[root@localhost test]# sudo chattr +i /tmp/func-system.log
[root@localhost test]# ll /tmp/func
func             func-system.log
[root@localhost test]# ll /tmp/func-system.log
-rw-r--r--. 1 root root 1079 Apr  7 01:09 /tmp/func-system.log
[root@localhost test]# lsattr /tmp/func-system.log
----i----------- /tmp/func-system.log
29、查找head命令的文件路径
bash[root@localhost test]# which head
/usr/bin/head
30、查找系统中所有文件名为file的文件列表
bash[root@localhost test]# find / -name file
/sys/fs/selinux/class/file
/sys/fs/selinux/initial_contexts/file
/usr/bin/file
/usr/share/file
31、查找系统中最近三天修改过的文件列表
[root@localhost test]# find / -mtime -3
32、使用nebula用户删除natasha.file是否可以删除掉?
- 可以
- 删除 file1 文件 natasha.file - - 能够进入 /tmp 具有目录修改的权限即可!
bash[root@localhost ~]# ll /
drwxrwxrwt.  10 root root 4096 Apr  7 15:33 tmp
33、使用用户nebula在test2目录中创建文件nebbab
bash[root@localhost test2]# su - nebula
Last login: Sun Apr  7 00:56:06 CST 2024 on pts/0
[nebula@localhost ~]$ touch /tmp/test/test2/nebbab
[nebula@localhost ~]$ ls /tmp//test/test2/
nebbab
[nebula@localhost ~]$ ll /tmp/test/
total 4
-rw-r--r--. 1 root root 48 Apr  7 00:45 example.txt
drwxrwxrwx. 2 root root 20 Apr  7 15:43 test2
[nebula@localhost ~]$ ll /tmp/test/test2/
total 0
-rw-rw-r--. 1 nebula nebula 0 Apr  7 15:43 nebbab
34、使用用户natasha在test2目录中创建文件natasha1
bash[root@localhost test2]# su - natasha
Last login: Sun Apr  7 15:46:19 CST 2024 on pts/0
[natasha@localhost ~]$ touch /tmp/test/test2/natasha1
[natasha@localhost ~]$ ls /tmp/test/test2/
natasha1  nebbab
[natasha@localhost ~]$ ll /tmp/test/test2/
total 0
-rw-rw-r--. 1 natasha natasha 0 Apr  7 15:47 natasha1
-rw-rw-r--. 1 nebula  nebula  0 Apr  7 15:43 nebbab
[natasha@localhost ~]$ ll /tmp/test/
total 4
-rw-r--r--. 1 root root 48 Apr  7 00:45 example.txt
drwxrwxrwx. 2 root root 36 Apr  7 15:47 test2
35、nebula用户是否可以编辑natasha1文件,为什么?
-
不可以
-
因为nebula用户在natasha1文件权限中属于其他用户(other) , 然而其他用户权限只有读取权限(r--)想要修改文件至少需要读取和写入权限(rw-),所以不可以编辑
bash[natasha@localhost ~]$ ll /tmp/test/test2/
total 0
-rw-rw-r--. 1 natasha natasha 0 Apr  7 15:47 natasha1
-rw-rw-r--. 1 nebula  nebula  0 Apr  7 15:43 nebbab
[natasha@localhost ~]$ ll /tmp/test/
total 4
-rw-r--r--. 1 root root 48 Apr  7 00:45 example.txt
drwxrwxrwx. 2 root root 36 Apr  7 15:47 test2
36、nebula用户是否可以删除natasha1文件,为什么?
- 可以
- 因为删除一个文件其实和它的文件权限没有太大关系 , 和文件所在的目录权限有关 ,至少需要文件所在目录的写入和可执行权限(-wx) 即能够进入目录并具有目录修改的权限即可
- natasha1所在目录为/tmp/test/test2/ 其目录权限为777权限具有可读取、可写入、可执行,所以可以删除
bash[natasha@localhost ~]$ ll /tmp/test/test2/
total 0
-rw-rw-r--. 1 natasha natasha 0 Apr  7 15:47 natasha1
-rw-rw-r--. 1 nebula  nebula  0 Apr  7 15:43 nebbab
[natasha@localhost ~]$ ll /tmp/test/
total 4
-rw-r--r--. 1 root root 48 Apr  7 00:45 example.txt
drwxrwxrwx. 2 root root 36 Apr  7 15:47 test2
37、创建新文件 /tmp/iplist.txt 并将以下内容复制到文件内。统计这个文件内每个IP地址出现的次数,并能够由次数由小到大的顺序排列。
bash[root@localhost ~]# vim /tmp/iplist.txt
[root@localhost ~]# sort /tmp/iplist.txt | uniq -c | sort -n
      1
      2 10.230.31.87
     47 10.230.20.237
     80 10.230.20.47
     93 10.230.28.5
    196 10.230.27.138
sort /tmp/iplist.txt:将文件中的行排序。uniq -c:删除重复的行,并在每行前面显示该行在输入中出现的次数。sort -n:将结果按照数值(在这个情况下是每个IP地址出现的次数)进行排序。
38.配置本地yum仓库 光驱挂载位置/media
1.vmware下操作
-
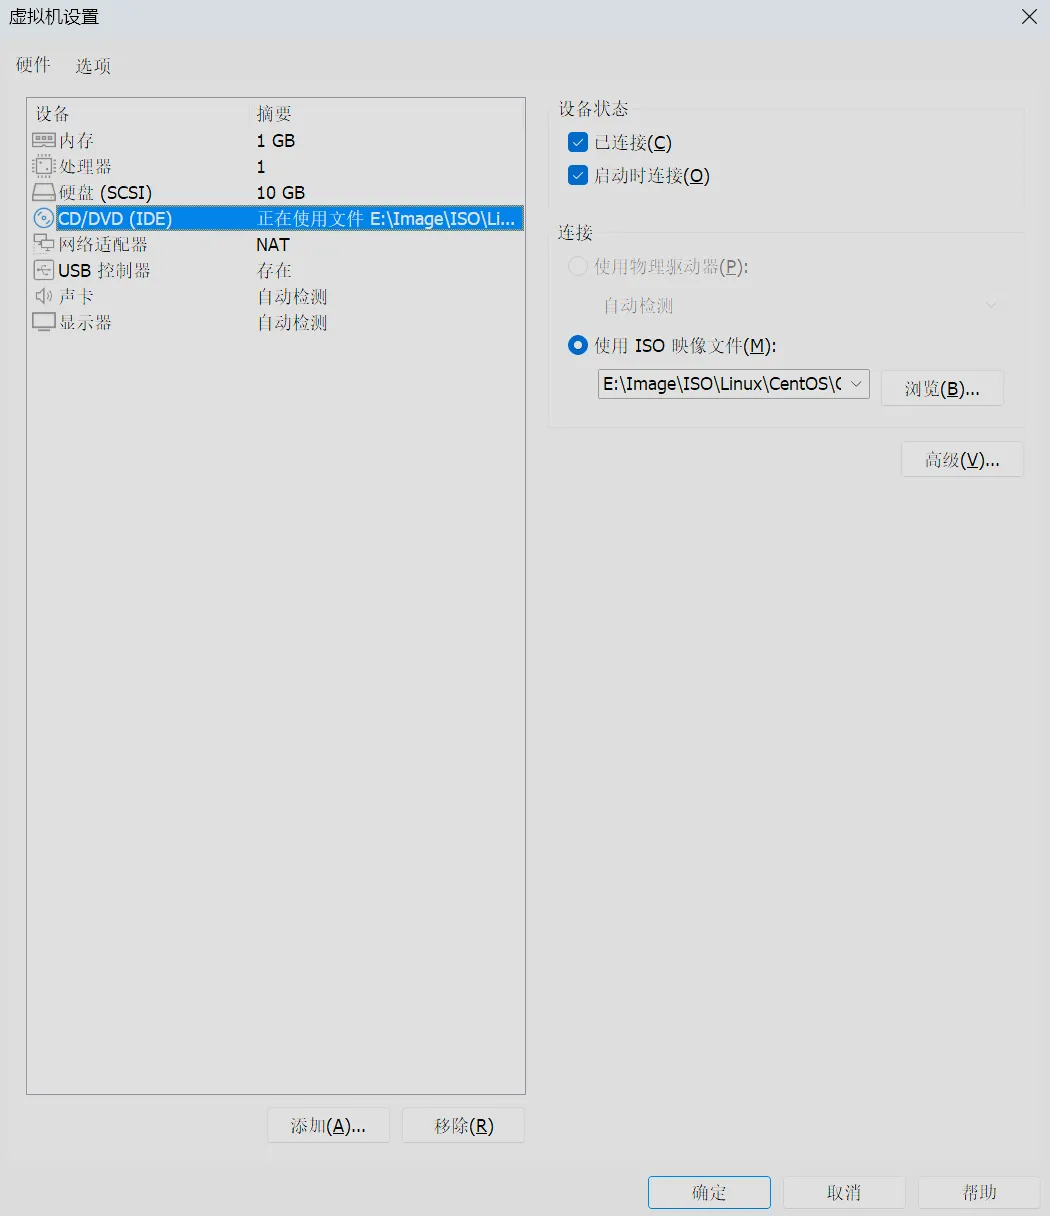
打开虚拟机设置
-
在CD/DVD选项中, 将ISO镜像切换为Everything
-
在设备状态中选择启动时

2. 挂载
bash[root@centosMini03 ~]# mount /dev/sr0 /media/
mount: /dev/sr0 is write-protected, mounting read-only
39.使用本地yum源仓库安装httpd
1. 配置本地源
bash[root@centosMini03 ~]# cd /etc/yum.repos.d/
[root@centosMini03 yum.repos.d]# ls
CentOS-Base.repo  CentOS-CR.repo  CentOS-Debuginfo.repo  CentOS-fasttrack.repo  CentOS-Media.repo  CentOS-Sources.repo  CentOS-Vault.repo
[root@centosMini03 yum.repos.d]# mkdir back
[root@centosMini03 yum.repos.d]# mv * ./back/
[root@centosMini03 yum.repos.d]# ls
back
[root@centosMini03 yum.repos.d]# cp back/CentOS-Media.repo .
[root@centosMini03 yum.repos.d]# ls
back  CentOS-Media.repo
[root@centosMini03 yum.repos.d]# mv CentOS-Media.repo local.repo
[root@centosMini03 yum.repos.d]# ls
back  local.repo
2. 编辑repo文件
bashvim local.repop
repo# This is Local yum repo

[c7-media]
name=Local repo
baseurl=file:///media
gpgcheck=0
enabled=1
-
清除并更新 YUM 缓存:
bash[root@centosMini03 yum.repos.d]# yum clean all
Loaded plugins: fastestmirror
Cleaning repos: c7-media
Other repos take up 211 M of disk space (use --verbose for details)
[root@centosMini03 yum.repos.d]# yum makecache
Loaded plugins: fastestmirror
Determining fastest mirrors
c7-media                                                                                                                             | 3.6 kB  00:00:00
(1/4): c7-media/group_gz                                                                                                             | 153 kB  00:00:00
(2/4): c7-media/primary_db                                                                                                           | 6.1 MB  00:00:00
(3/4): c7-media/filelists_db                                                                                                         | 7.2 MB  00:00:00
(4/4): c7-media/other_db                                                                                                             | 2.6 MB  00:00:00
Metadata Cache Created
3.安装httpd
bash[root@centosMini03 yum.repos.d]# yum install httpd
40.源码安装的步骤有那些
- 下载源代码 - wget
- 解压源代码 - tar xzf filename.tar.gz
- 配置 - ./configure
- **编译 ** - make
- 安装 - make install
41.源码安装nginx并能启动访问(额外内容:修改主页,访问显示内容为自己的名字)
- 下载源码文件
- 解压缩
bash[root@centosMini03 ~]# wget https://nginx.org/download/nginx-1.24.0.tar.gz
--2024-04-18 20:56:55--  https://nginx.org/download/nginx-1.24.0.tar.gz
Resolving nginx.org (nginx.org)... 198.18.0.189
Connecting to nginx.org (nginx.org)|198.18.0.189|:443... connected.
HTTP request sent, awaiting response... 200 OK
Length: 1112471 (1.1M) [application/octet-stream]
Saving to: ‘nginx-1.24.0.tar.gz’

100%[==================================================================================================================>] 1,112,471    888KB/s   in 1.2s

2024-04-18 20:56:59 (888 KB/s) - ‘nginx-1.24.0.tar.gz’ saved [1112471/1112471]

[root@centosMini03 ~]# tar -xzf nginx-1.24.0.tar.gz
[root@centosMini03 ~]# ls
anaconda-ks.cfg  nginx-1.24.0  nginx-1.24.0.tar.gz
- 安装依赖
bashyum install gcc
yum install pcre pcre-devel
yum install zlib zlib-devel
- 配置
bash[root@centosMini03 nginx-1.24.0]# ./configure
- 编译
bash[root@centosMini03 nginx-1.24.0]# make
- 安装
bash[root@centosMini03 nginx-1.24.0]# make install
- 未指定安装位置, 故安装到默认位置 (/usr/local/nginx)
bash[root@centosMini03 nginx-1.24.0]# cd /usr/local/nginx/
[root@centosMini03 nginx]# ls
conf  html  logs  sbin
- 启动nginx
bash[root@centosMini03 nginx]# cd sbin/
[root@centosMini03 sbin]# ls
nginx
[root@centosMini03 sbin]# ./nginx
- 开放防火墙
bash[root@centosMini03 sbin]# iptables -F
- 修改默认页面
bash[root@centosMini03 conf]# cd ..
[root@centosMini03 nginx]# ls
client_body_temp  conf  fastcgi_temp  html  logs  proxy_temp  sbin  scgi_temp  uwsgi_temp
[root@centosMini03 nginx]# cd html/
[root@centosMini03 html]# ls
50x.html  index.html
[root@centosMini03 html]# mv index.html index.html.bak
[root@centosMini03 html]# vim index.html
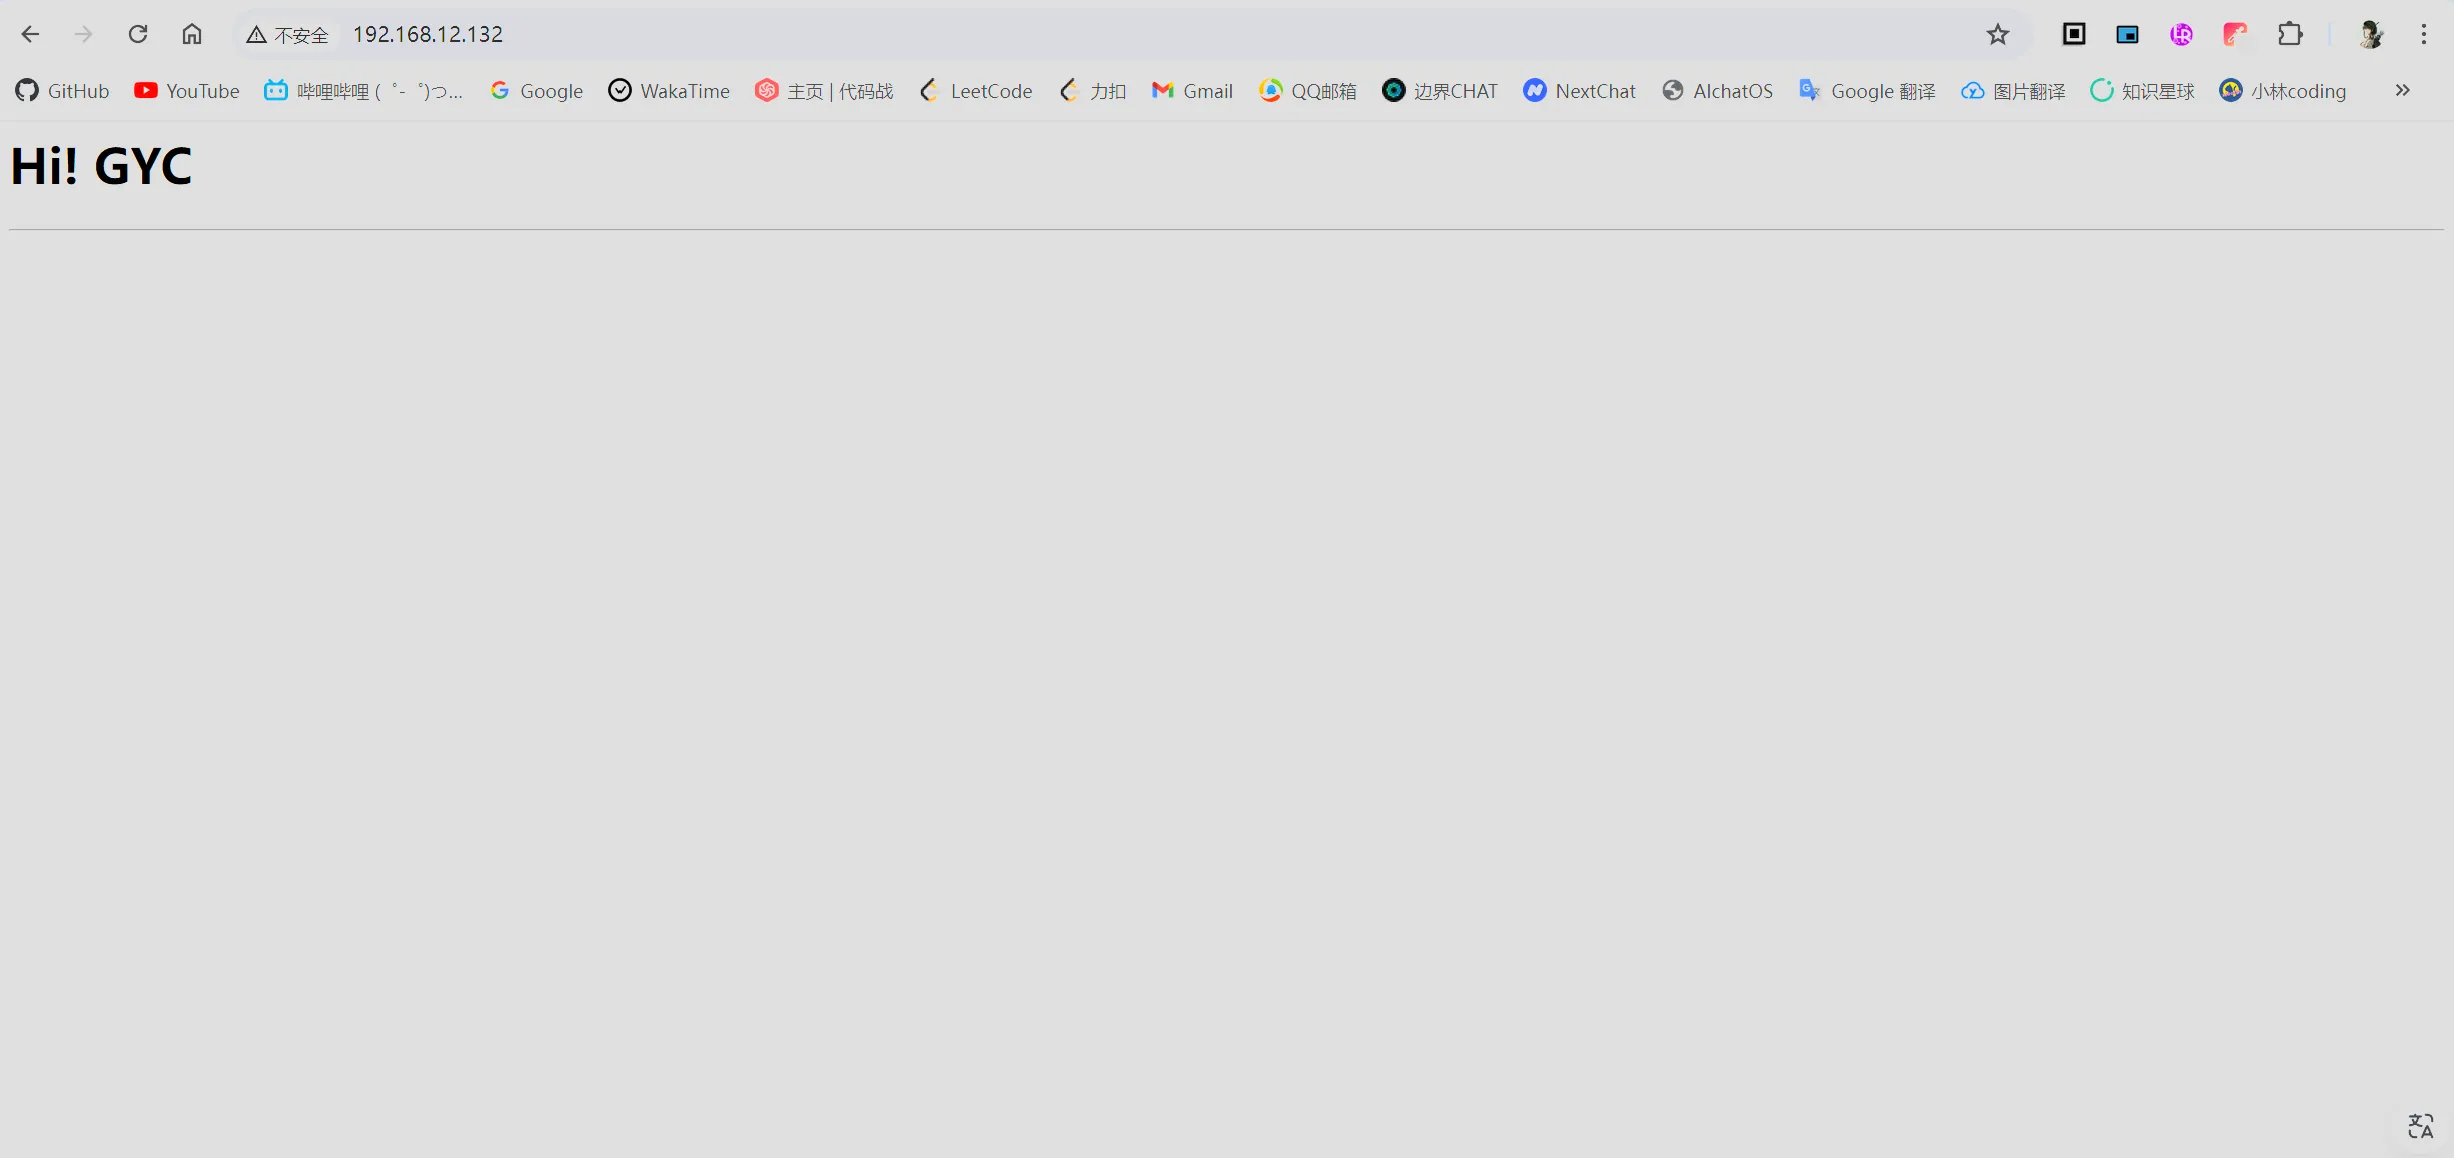
- 修改让其显示自己名字
bashvim index.html
html<h1> Hi! GYC </h1>
<hr>
- 显示页面

42.执行下面命令获取结果截图:rpm -q basesystem --qf '%{installtime}\n'|cut -d " " -f 2-6
bash[root@centosMini03 html]# rpm -q basesystem --qf '%{installtime:date}\n'|cut -d " " -f 2-6
18 Apr 2024 07:15:38 PM
如果对你有用的话,可以打赏哦
打赏


本文作者:GYC
本文链接:
版权声明:本博客所有文章除特别声明外,均采用 BY-NC-SA 许可协议。转载请注明出处!
目录