目录
WordPress简述
WordPress是一个开源的内容管理系统(CMS),用于创建和管理网站。它是使用PHP语言编写的,并使用MySQL数据库进行数据存储。具有大量的主题和插件,拥有庞大的社区支持,用户可以通过论坛、博客、教程等途径获取帮助和分享经验。总之,WordPress是一个强大而灵活的网站建设工具,适用于各种规模和类型的网站建设项目。无论是个人用户还是企业机构,都可以通过WordPress实现他们的网站目标。
基础架构
本次项目主要用到LNMP(Linux+Nginx+Mysql+PHP)架构。
环境描述
前期准备
换源
由于CentOS停止维护, 导致默认的官方源无法正常使用 因此, 将yum源换为阿里云Centos源
- 备份以前官方源
bashcd /etc/yum.repos.d/
mkdir back
mv *.repo back
- 换为阿里源
- wget默认没有安装, 因此使用curl下载
bashcurl -o /etc/yum.repos.d/CentOS-Base.repo https://mirrors.aliyun.com/repo/Centos-7.repo
yum clean all
yum makecache
- 可以安装软件测试一下
bashyum install vim
关闭防火墙
bashsystemctl  stop  firewalld
systemctl  disable  firewalld
关闭selinux
bashvim /etc/sysconfig/selinux
SELINUX=disabled
- 修改好配置文件后需要重启系统才能生效
安装基础服务
安装php
bashyum install php php-fpm php-cli php-common php-gd php-mbstring php-mysql php-pdo php-devel phpxmlrpc php-xml php-bcmath php-dba php-enchant
- 使用
php -v查看是否安装成功, 安装成功则输出版本号
Nginx
安装Nginx
- nginx官网
- 这里使用yum安装nginx
- 配置nginx yum源
bashyum install yum-utils
cd /etc/yum.repos.d/
vim nginx.repo

[nginx-stable]
name=nginx stable repo
baseurl=http://nginx.org/packages/centos/$releasever/$basearch/
gpgcheck=1
enabled=1
gpgkey=https://nginx.org/keys/nginx_signing.key
module_hotfixes=true

[nginx-mainline]
name=nginx mainline repo
baseurl=http://nginx.org/packages/mainline/centos/$releasever/$basearch/
gpgcheck=1
enabled=0
gpgkey=https://nginx.org/keys/nginx_signing.key
module_hotfixes=true

yum clean all
yum makecache
- 安装nginx
bashyum install nginx
- 测试
bashnginx -v
- 如果输出版本号则安装成功
- 启动nginx服务
bashsystemctl start nginx
- 访问自己IP/域名的80(默认)端口
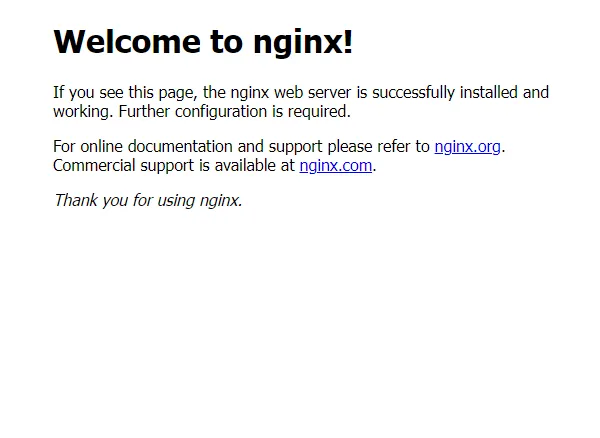
使nginx支持php
- 修改nginx配置文件
bashcd /etc/nginx/conf.d/
vim default.conf

# pass the PHP scripts to FastCGI server listening on 127.0.0.1:9000
#
location ~ \.php$ {
    root /usr/share/nginx/html;
    fastcgi_pass   127.0.0.1:9000;
    fastcgi_index  index.php;
    # fastcgi_param  SCRIPT_FILENAME  /scripts$fastcgi_script_name;
    fastcgi_param  SCRIPT_FILENAME  $document_root$fastcgi_script_name;
    include        fastcgi_params;
}
- 创建测试文件
vim /usr/share/nginx/html/index.php
<?php
phpinfo();
?>
- 重新启动nginx和php-fpm服务
bashsystemctl restart php-fpm
systemctl restart nginx
- 测试
- 浏览器输入
IP/index.php
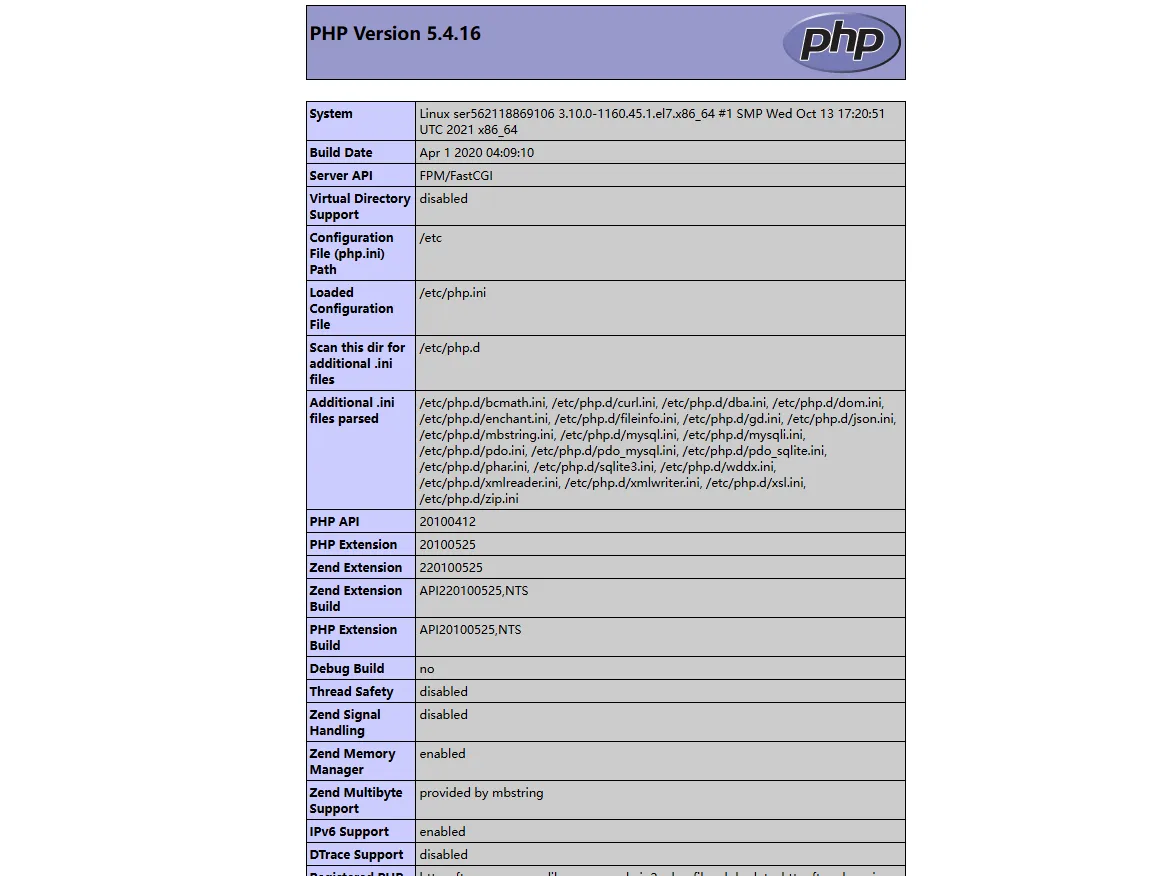
- 出现此页面即为成功
mysql
安装mysql
- 使用编译安装
- mysql官网
- 安装编译依赖
bashyum install gcc gcc-c++ make
- 解压rpm包并安装
- 卸载mariadb
bashrpm -e postfix-2:2.10.1-9.el7.x86_64
rpm -e mariadb-libs-5.5.68-1.el7.x86_64
- rpm 安装mysql
bashtar xf mysql-8.0.16-2.el7.x86_64.rpm-bundle.tar -C /opt/
cd /opt
yum localinstall *
- 启动mysql服务并查找密码登录mysql
bashsystemctl start mysqld
grep "password" /var/log/mysqld.log
mysql -u root -p
- 修改mysql密码
bashALTER USER 'root'@'localhost' IDENTIFIED BY 'password';
- 将
password改为自己的密码
配置并安装WordPress
创建数据库
bashmysql -uroot -p
create database wordpress;
mysql> show databases;
+--------------------+
| Database           |
+--------------------+
| information_schema |
| mysql              |
| performance_schema |
| sys                |
| wordpress          |
+--------------------+
5 rows in set (0.01 sec)
配置nginx
bashcd /etc/nginx/conf.d/
vim default.conf

server {
    listen       80;
    server_name  localhost;

    location / {
        root   /www/wordpress;
        index  index.php index.html index.htm;
    }

    location ~ \.php$ {
        root           /www/wordpress;
        fastcgi_pass   127.0.0.1:9000;
        fastcgi_index  index.php;
        fastcgi_param  SCRIPT_FILENAME  $document_root$fastcgi_script_name;
        include        fastcgi_params;
    }
}
- 参照上述配置修改nginx配置
- 使用
nginx -t检查nginx配置 - 创建目录
mkdir /www
WordPress
- WordPress官网
- 按照自己的mysql、php和nginx版本选择合适的WordPress版本
- 我的版本是WordPress-5.8.5
解压安装WordPress
bashtar -zxf wordpress-5.8.5-zh_CN.tar.gz
mv wordpress /www
配置WordPress
bashcd /www/wordpress/
cp wp-config-sample.php wp-config.php
vim wp-config.php

//根据自己设置的数据库,对应修改下面配置

/** The name of the database for WordPress */
define( 'DB_NAME', 'wordpress' );

/** Database username */ 用户名
define( 'DB_USER', 'root' );

/** Database password */ 密码
define( 'DB_PASSWORD', 'Wordpress123!' );

/** Database hostname */ (如果是localhost 最好写成IP 127.0.0.1 不然之后可能会报错)
define( 'DB_HOST', '127.0.0.1' );

/** Database charset to use in creating database tables. */
define( 'DB_CHARSET', 'utf8' );

/** The database collate type. Don't change this if in doubt. */
define( 'DB_COLLATE', '' );
重启服务
bashsystemctl restart php-fpm
systemctl restart nginx
``

# CentOS升级php
- 由于访问IP弹出`Your server is running PHP version 5.4.16 but WordPress 5.8.5 requires at least 5.6.20.`
- 显示php版本低不匹配, 因此需要升级php版本

## 升级步骤
```bash
// 添加 Remi 存储库
yum install -y yum-utils
yum install -y epel-release
yum install -y http://rpms.remirepo.net/enterprise/remi-release-7.rpm

// 启用所需的 PHP 版本
yum-config-manager --enable remi-php74

// 升级 PHP
yum install -y php php-fpm php-cli php-common php-gd php-mbstring php-mysqlnd php-pdo php-xml php-xmlrpc php-bcmath php-dba php-enchant

// 检查 PHP 版本
php -v

// 重启相关服务
systemctl restart nginx
systemctl restart php-fpm
升级好php并重启服务后再次访问ip配置成功
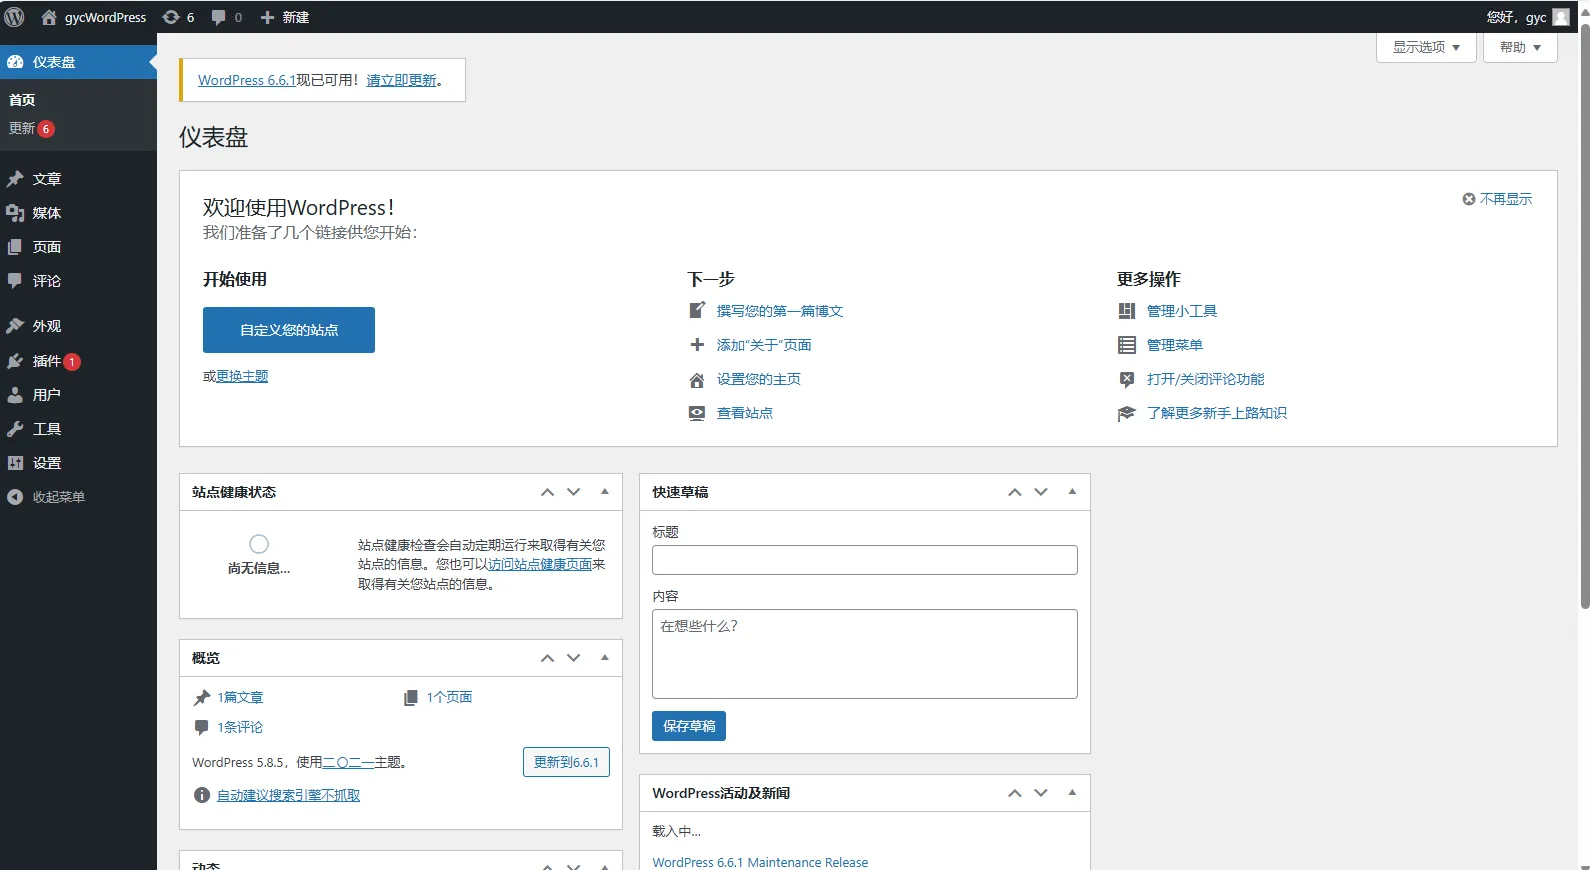
配置域名解析
方法一
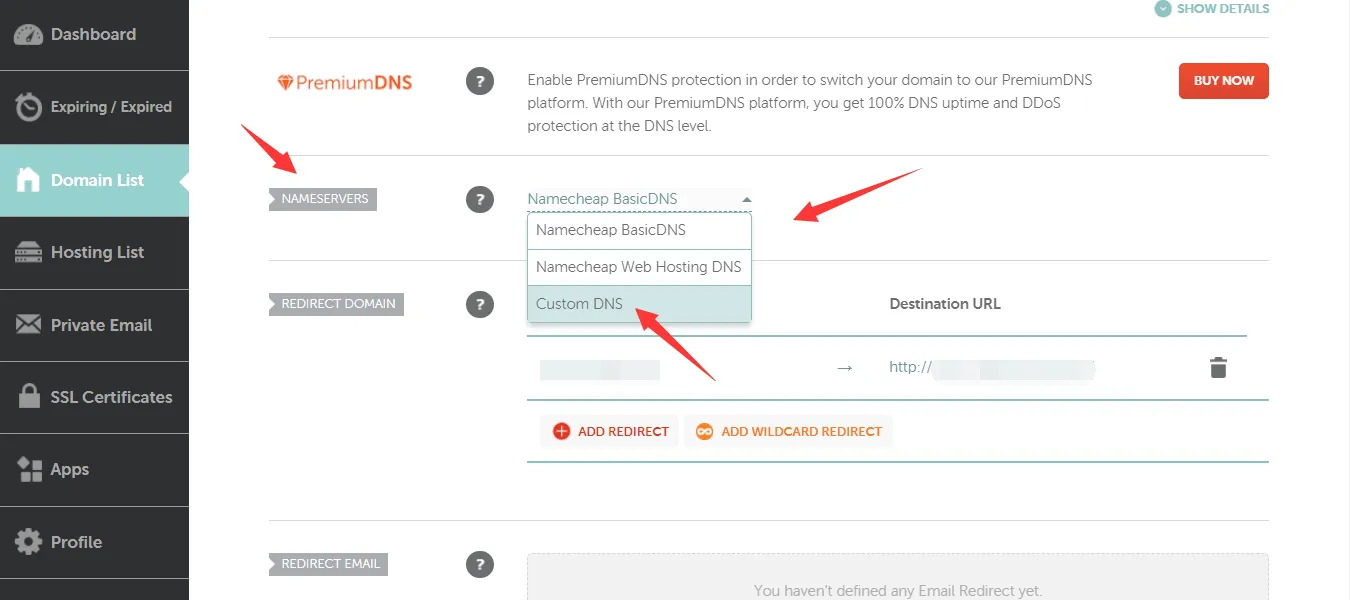
- 登陆 Namecheap 后台,先点左侧菜单的 Domain List,然后点右边的 MANAGE 按钮。
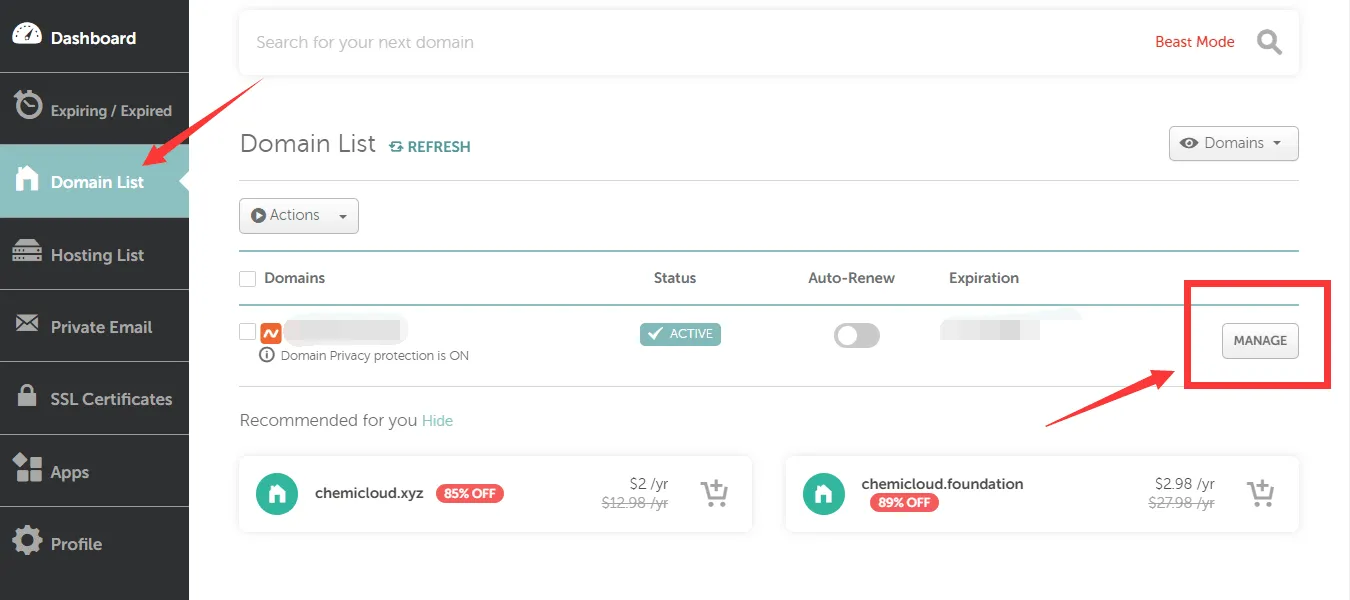
- 找到 Nameservers 选项,在下拉菜单里选择 Custom DNS(自定义 DNS)。
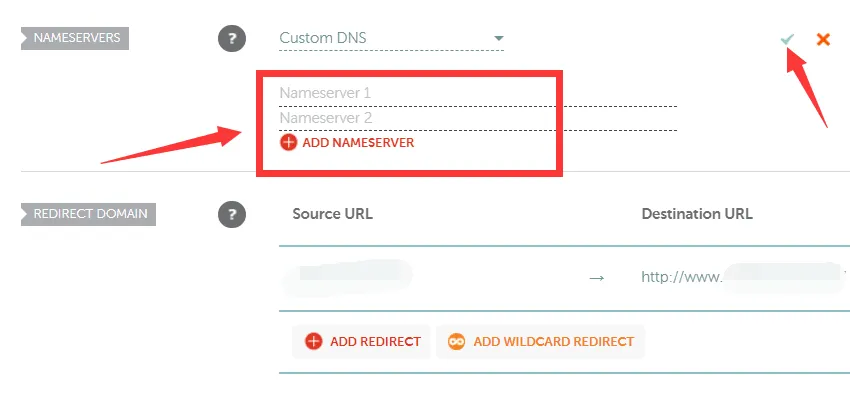
- 接下来,依次填写主机服务器 NS 地址,每行填一个。如果你的主机不止 2 个 NS 地址,可以点 ADD NAMESERVER 增加行数。全部填完后,记得点右边的绿勾保存更改。
方法二
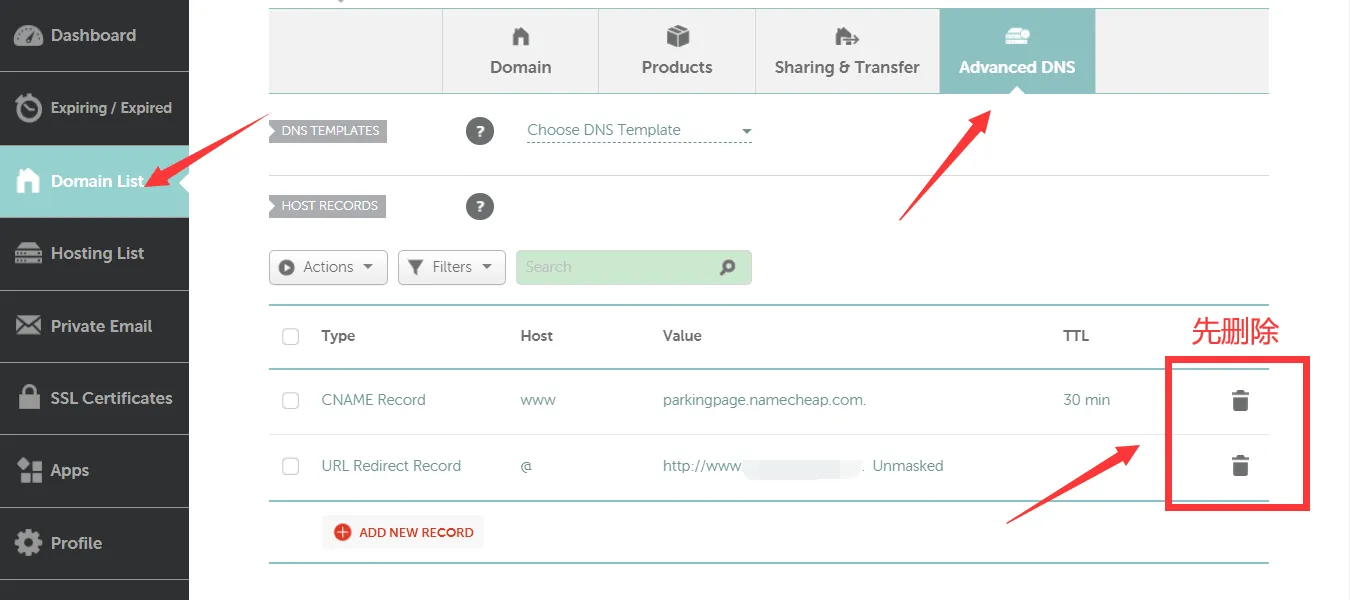
- 登陆 Namecheap 后台,转到左侧菜单的 Domain List > MANAGE > Advanced DNS 选项卡,删除默认的两条域名解析记录。
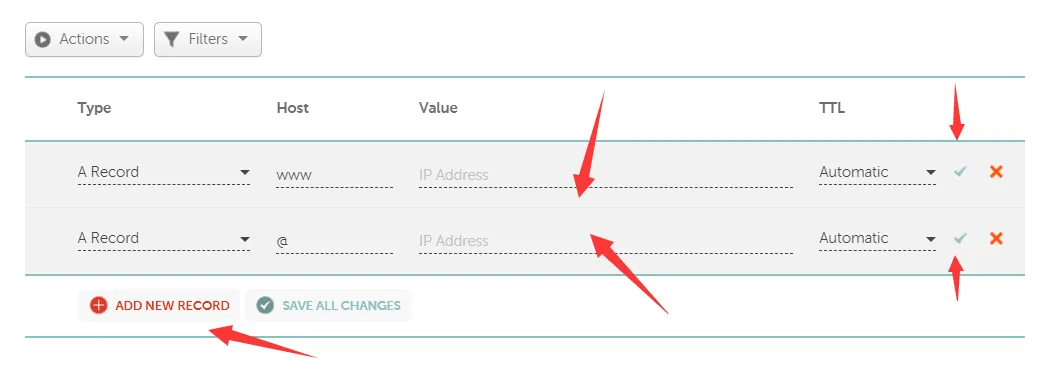
- 点击 ADD NEW RECORD 新增两条 A 记录,一条的 Host 填 www,另一条的 Host 填 @,而 Value 是指主机的 IP 地址,要到主机后台查看,两条都是一样的,填好后保存修改。
参考和引用
如果对你有用的话,可以打赏哦
打赏


本文作者:GYC
本文链接:
版权声明:本博客所有文章除特别声明外,均采用 BY-NC-SA 许可协议。转载请注明出处!
目录